• Skip to main content
  • Skip to primary sidebar
  • Blog
  • Tees
  • Facebook Group
  • Amazon Favs
  • Podcast
  • Learn with Ashley
  • Shop
    • Shop My Site
    • Shop TpT

Teach Create Motivate

A motivational website with creative resources for teachers.

  • Classroom Management
  • Reading
  • Student Engagement
  • Classroom Community
  • Seasonal
  • Classroom Ideas
Home
  • Blog
    • Classroom Management
    • Reading
    • Student Engagement
    • Classroom Community
    • Seasonal
    • Classroom Ideas
  • Tees
  • Facebook Group
  • Amazon Favs
  • Podcast
  • Learn With Ashley
  • Shop

DIY Classroom Photo Booth

Hey Hey! I am so excited to be finally blogging about how to make your very own classroom photo booth.

1

 This is something I made and started last year and my students and parents loved it! I used it a total of 3 times throughout the year (Meet the Teacher Night, Open House, and the last day of school), but could have definitely used it more. I love it because it is so easy to make and doesn't break the bank! It is the perfect back to school project for your classroom!

Here I will tell you all the things you need to make and use it throughout the year as well as how to make it (it really doesn't take that long!). I also have some fun freebies for you at the end of this post to go along with your classroom photo booth!

whatneed

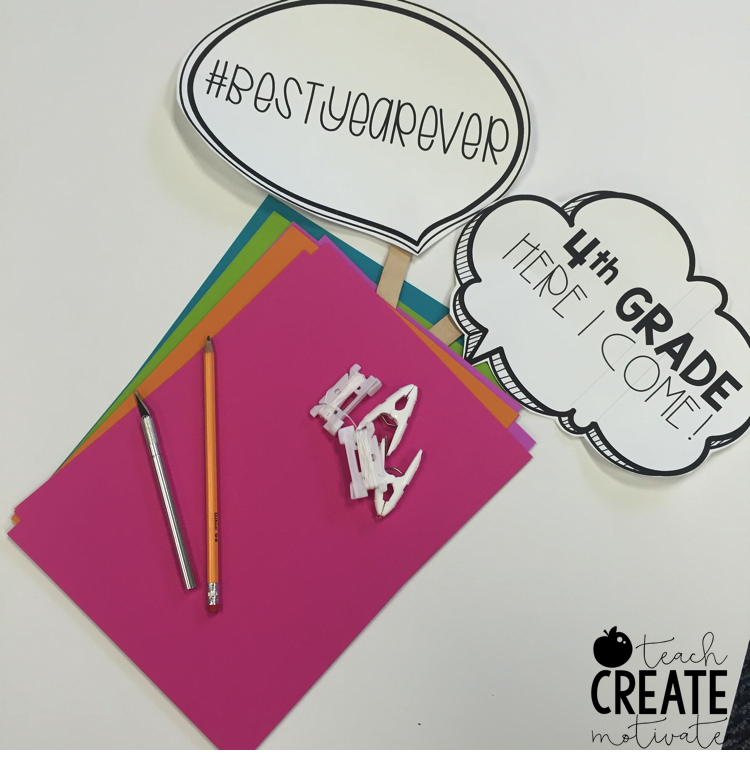
  • Mounting Board from Hobby Lobby (white matte-$7) These are located near the back of the store in the tall skinny shelves. I like to use the thinner mounting board vs. the thick foam board. It is easier to cut and looks better without being so shiny.
  • Exacto Knife: Grab on Amazon HERE 
  • Bright Colored Cardstock (Hobby Lobby, Michaels, Or Amazon HERE–this is my favorite pack of colors!)
  • Ruler
  • Pencil
  • Ceiling Hangers- HERE on AmazonmaterialsOnce you have the mounting board, ruler, and Exacto knife you are ready to go!!

Here are the steps of making your photo booth: 

123

1

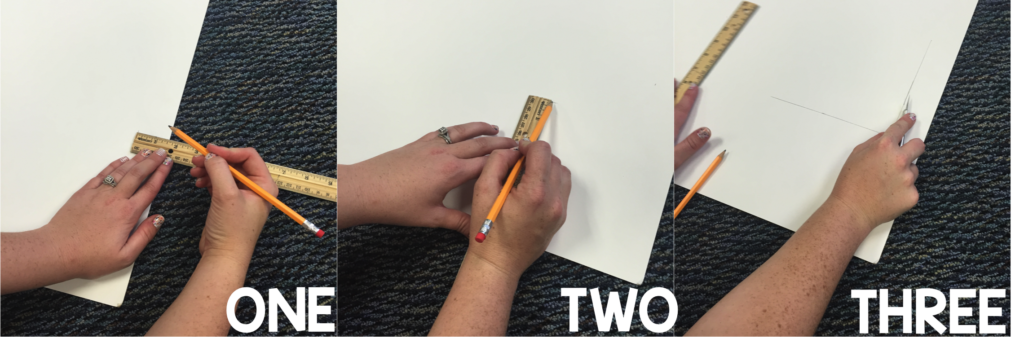
Use your pencil and ruler to draw a rectangle on your board. You want the rectangle to be about 6-7 inches from the bottom, and leave 1.5 inches on the sides and top. This makes it looks like a polaroid type photo. Draw the lines lightly-you can also erase mistakes later!

2

With your board being on a flat surface (that you don't want to damage!), use the Exacto knife to carefully cut out the rectangle you just drew. Don't worry-it doesn't have to be perfect!3

Now all you have to do is add a saying at the bottom and hang it up! You have yourself a photo booth!

I use the bright colored cardstock to cut out letters for the bottom. Last year I spelt out #thirdgrade, Open House 2016, and #straightoutta3rd. It was a hit! I use my cameo (don't have one? It can be a little pricey, but WELL WORTH IT!), but you can also print letters on card stock and cut them by hand. There's  a set I made for you for free that says: HAPPY 1ST DAY! Get it HERE. 

Use your ceiling hangers to attach the photo booth to the ceiling. My coworker told me about these things and they are amazing for hanging things in the classroom!

props

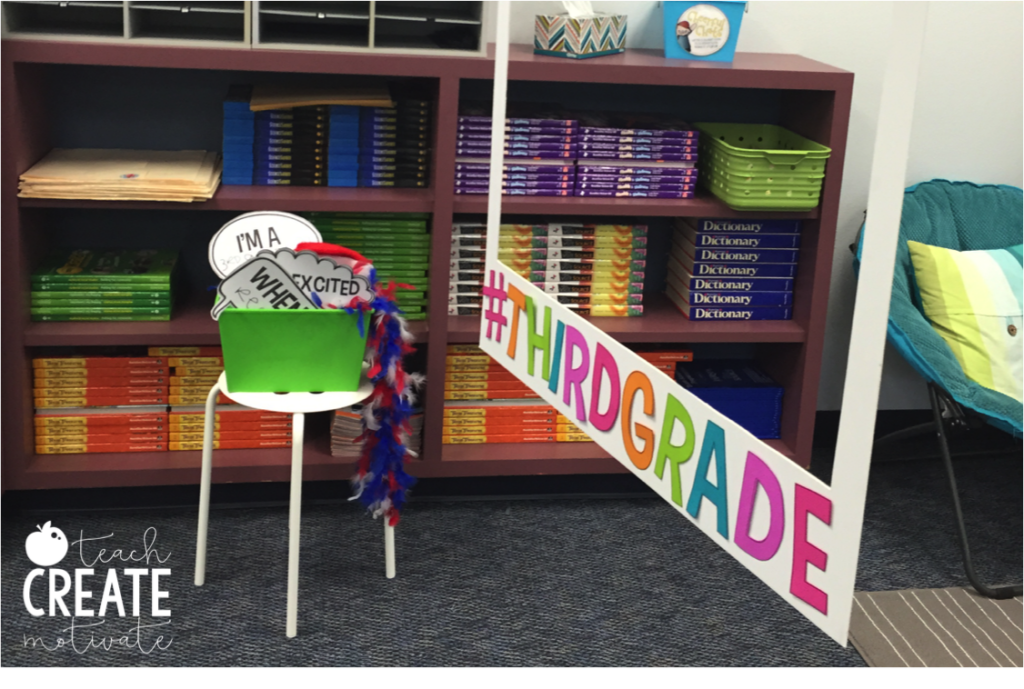
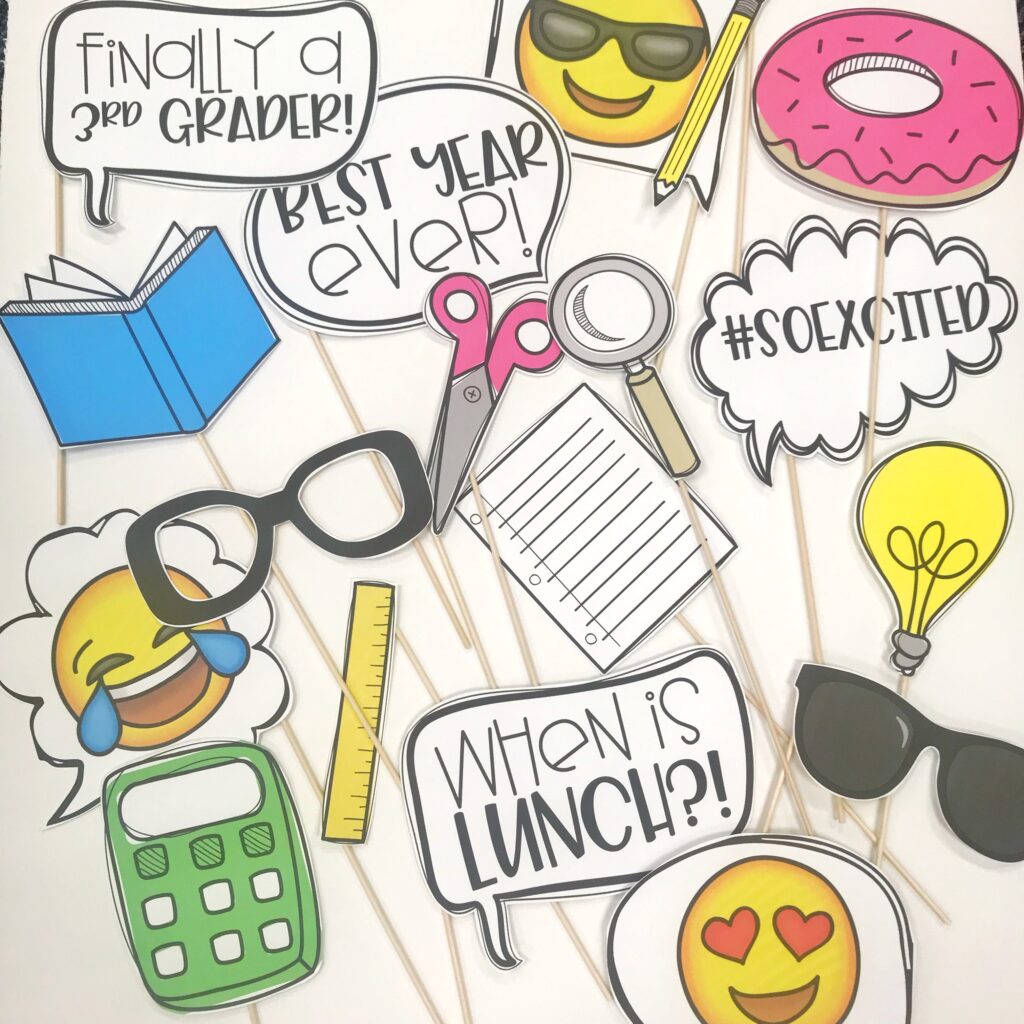
As an extra touch, grab some props for your students to use! In my props basket I have: speech bubbles, a boa, sunglasses, a crown, and more random things they can use to pose!

3


I made some free speech bubble signs for you for free! Print them on card stock and stick them on a popsicle stick! Enter your information below to grab them. 

More props found HERE!

I hope you love your classroom photo booth! I know your students will! Pin the image below to save this post for later.

2

If you are interested in a growing resource of tons of themed photo booth props and letters click HERE to check them out!

Tweet
Share
Pin4K
Share288
4K Shares
End of the Year Activities
Activities & Read Alouds to Teach Growth Mindset

Reader Interactions

33 Comments

  1. Valerie

    July 15, 2016 at 3:03 pm

    I LOVE THIS and have been anxiously awaiting a post on how to make one! How do you attach the letters at the bottom so they don’t damage the board when you take them off?

    Reply to this comment to Valerie" aria-label=' Reply to this comment to Valerie'> Reply to this comment
    • teachcreatemotivate@gmail.com

      August 6, 2016 at 1:56 pm

      I just use tape and lightly stick them on. Some of it tears off but it is covered by the next letters!

      Reply to this comment to teachcreatemotivate@gmail.com" aria-label=' Reply to this comment to teachcreatemotivate@gmail.com'> Reply to this comment
  2. Lisa V

    July 15, 2016 at 4:03 pm

    So cute!! Thank you!!

    Reply to this comment to Lisa V" aria-label=' Reply to this comment to Lisa V'> Reply to this comment
  3. Christine

    July 15, 2016 at 5:06 pm

    Hi! I’m making one!! Thank you! What kind of string did you use to attach the sign to the ceiling hangers? Or does something come with the kit?

    Reply to this comment to Christine" aria-label=' Reply to this comment to Christine'> Reply to this comment
    • Christine

      July 15, 2016 at 5:07 pm

      Just read the kit description. Never mind! ?

      Reply to this comment to Christine" aria-label=' Reply to this comment to Christine'> Reply to this comment
    • teachcreatemotivate@gmail.com

      August 6, 2016 at 1:55 pm

      It all comes together! with the link I posted to Amazon. 🙂

      Reply to this comment to teachcreatemotivate@gmail.com" aria-label=' Reply to this comment to teachcreatemotivate@gmail.com'> Reply to this comment
  4. Gina

    July 15, 2016 at 5:49 pm

    Such a cute idea!

    Reply to this comment to Gina" aria-label=' Reply to this comment to Gina'> Reply to this comment
  5. Christina

    July 15, 2016 at 7:42 pm

    Thank you so much for posting this! I have been wanting to have a photo booth in my class for a couple of years now. This is super cute! What font did you use for the bottom “#thirdgrade”?

    Reply to this comment to Christina" aria-label=' Reply to this comment to Christina'> Reply to this comment
  6. Liz

    July 16, 2016 at 3:12 am

    Do you have more speech bubbles available to purchase ?

    Reply to this comment to Liz" aria-label=' Reply to this comment to Liz'> Reply to this comment
  7. Lori L.

    July 17, 2016 at 6:39 pm

    What is the appropriate size of the mounting board? Was one big enough?

    Reply to this comment to Lori L." aria-label=' Reply to this comment to Lori L.'> Reply to this comment
    • teachcreatemotivate@gmail.com

      August 6, 2016 at 1:54 pm

      The draftboard only comes in one size–and yes big enough!

      Reply to this comment to teachcreatemotivate@gmail.com" aria-label=' Reply to this comment to teachcreatemotivate@gmail.com'> Reply to this comment
  8. Antionette

    July 18, 2016 at 12:46 pm

    Did you take the pictures or let them do it themselves?

    Reply to this comment to Antionette" aria-label=' Reply to this comment to Antionette'> Reply to this comment
    • teachcreatemotivate@gmail.com

      August 6, 2016 at 1:54 pm

      A little of both!

      Reply to this comment to teachcreatemotivate@gmail.com" aria-label=' Reply to this comment to teachcreatemotivate@gmail.com'> Reply to this comment
  9. Reba

    July 18, 2016 at 3:42 pm

    Hello! I would love to make one of these! What style of font did you use for the letters? I would need to print copy and cut.

    Reply to this comment to Reba" aria-label=' Reply to this comment to Reba'> Reply to this comment
  10. Shawna

    July 18, 2016 at 6:41 pm

    What font did you use for the letters you made? Can I edit it? Thanks! Shawna

    Reply to this comment to Shawna" aria-label=' Reply to this comment to Shawna'> Reply to this comment
  11. Lori

    July 18, 2016 at 6:52 pm

    LOVE LOVE LOVE this! Thank you SO MUCH for the freebies!! You Rock!

    Reply to this comment to Lori" aria-label=' Reply to this comment to Lori'> Reply to this comment
  12. marianna

    July 18, 2016 at 9:10 pm

    So great! I love doing a photo booth at the beginning of the year.

    Reply to this comment to marianna" aria-label=' Reply to this comment to marianna'> Reply to this comment
  13. Liz

    July 20, 2016 at 1:41 am

    What size mounting board did you use?

    Reply to this comment to Liz" aria-label=' Reply to this comment to Liz'> Reply to this comment
  14. Sam

    July 22, 2016 at 1:12 pm

    I LOVE this! Got everything to make it! Can’t wait to use it on Meet The Teacher night! Would it be possible to add “I’m a kindergartner” to the speech bubbles?

    Reply to this comment to Sam" aria-label=' Reply to this comment to Sam'> Reply to this comment
  15. Wendy Nametz

    July 24, 2016 at 3:40 pm

    Such a cute idea! Where did you get the speech bubble clip art? Think I am going to make a few more…

    Thank you!!!
    Wendy

    Reply to this comment to Wendy Nametz" aria-label=' Reply to this comment to Wendy Nametz'> Reply to this comment
  16. Pricilla

    July 31, 2016 at 2:13 am

    This is such a wonderful idea!!! Thank you so much for the detailed instructions!

    Reply to this comment to Pricilla" aria-label=' Reply to this comment to Pricilla'> Reply to this comment
  17. Cadence

    August 1, 2016 at 6:44 pm

    Hi, there! I am making a poster and I was wondering what font you use for the bottom of the Polaroid text? Thanks so much!

    Reply to this comment to Cadence" aria-label=' Reply to this comment to Cadence'> Reply to this comment
  18. Jessica

    August 4, 2016 at 8:03 pm

    I LOVE this idea and am excited to use this for our Back to School Night! I’m having trouble opening the free speech bubble signs. Is there any way you could email me the doc?

    Reply to this comment to Jessica" aria-label=' Reply to this comment to Jessica'> Reply to this comment
  19. Rachael

    August 5, 2016 at 4:03 pm

    What size is the mounting board? I am having trouble finding the one you used.

    Reply to this comment to Rachael" aria-label=' Reply to this comment to Rachael'> Reply to this comment
  20. Jenn

    August 5, 2016 at 8:45 pm

    How big is the poster board?

    Reply to this comment to Jenn" aria-label=' Reply to this comment to Jenn'> Reply to this comment
  21. Sam

    August 6, 2016 at 9:23 am

    How did you attach your letters onto the Instagram board? Thanks!

    Reply to this comment to Sam" aria-label=' Reply to this comment to Sam'> Reply to this comment
  22. Micaela

    August 18, 2016 at 9:54 pm

    You are so creative. Thanks for being such an inspiration!!

    Reply to this comment to Micaela" aria-label=' Reply to this comment to Micaela'> Reply to this comment
  23. Melissa Driscoll

    May 27, 2017 at 5:57 pm

    Love the photo booth idea thanks for sharing

    Reply to this comment to Melissa Driscoll" aria-label=' Reply to this comment to Melissa Driscoll'> Reply to this comment
  24. Tameika Wilson-Harris

    June 15, 2017 at 7:13 pm

    This is such a great and fun idea. The kids will have a blast!!!!

    Reply to this comment to Tameika Wilson-Harris" aria-label=' Reply to this comment to Tameika Wilson-Harris'> Reply to this comment
  25. Hollie

    July 10, 2017 at 3:31 pm

    I see you used draftboard instead of foam board. What is the difference? What kind of font did you use for #thirdgrade and what size is it?

    Reply to this comment to Hollie" aria-label=' Reply to this comment to Hollie'> Reply to this comment
  26. Hollie

    August 10, 2017 at 10:16 am

    I’d like to make the photo booth that says “#thirdgrade but I don’t see the link to the letters to make it. Is that available?

    Thanks,
    Hollie

    Reply to this comment to Hollie" aria-label=' Reply to this comment to Hollie'> Reply to this comment

Trackbacks

  1. 3 Ideas for a Stellar Transition Celebration says:
    February 21, 2017 at 7:01 am

    […] snacks or favors if your school permits it. You can even set up a simple yet special graduation photo booth for memories that last a […]

    Reply to this comment to 3 Ideas for a Stellar Transition Celebration" aria-label=' Reply to this comment to 3 Ideas for a Stellar Transition Celebration'> Reply to this comment
  2. 10 + Amazon Must Haves For Your Classroom - Teach Create Motivate says:
    March 11, 2017 at 11:57 pm

    […] It also has to be one of my most liked posts on Instagram with tons and tons of questions! We have flexible seating in our classroom and this might just be the favorite spot to sit by all of my students. It is also perfect for […]

    Reply to this comment to 10 + Amazon Must Haves For Your Classroom - Teach Create Motivate" aria-label=' Reply to this comment to 10 + Amazon Must Haves For Your Classroom - Teach Create Motivate'> Reply to this comment

Leave a Comment Cancel reply

Your email address will not be published. Required fields are marked *

This site uses Akismet to reduce spam. Learn how your comment data is processed.

Primary Sidebar

Hi, I’m Ashley

I am passionate about fostering student choice and independence in the classroom. I believe effective classroom management strategies and activities students enjoy creates a positive learning environment.

My goal is to provide unique ideas and quality resources to help teachers keep their students engaged and in love with learning

More About Me

F R E E // EMOJI ESCAPE ROOM TEMPLATE

Grab this free escape room template and add ANY content for your students to review in an engaging way!

Get the freebie!

F A L L Favorite Resources 🍂

Fall Reading Passages

Fall Themed Writing Prompts

Parent Teacher Conference Forms

Fall Themed Escape Room

Shop All Resources

Teach Create Motivate Podcast

  • 3 Areas to Systematize for Effective Classroom Management
  • Jamie Sears on Transforming Reluctant Writers Into Excited Writers
  • Using Student Shoutouts and Class Compliments to Strengthen Classroom Community
  • Hear How Teachers Are Using Classroom Management Games
  • Tips for Setting Yourself Up for Next Year
More Podcast Episodes

Join the TCM Insiders Facebook Group

Our Facebook group has over 7,000 other elementary school educators sharing their best tips, tricks, and ideas to TEACH...CREATE...AND MOTIVATE!

Join the Fun

Amazon Favorites

Magnetic Shelves!

Classroom Doorbell

Magnet Dots

Shop All Favs
  • Privacy Policy
  • Disclosures
  • Contact Me
  • Partner With Ashley

Copyright © 2023 Teach Create Motivate •  All rights reserved  •  Site Design by Emily White Designs